My philosophy when it comes to making Romanian blouses is document as much as possible before even getting the needle through the fabric. Reason being, anyone can hold a needle, but not anyone can make a Romanian blouse or any ethnic embroidery for that matter. I'm not being a purist or an elitist, it is a status easily achievable through seeing an enormous amount of correct Romanian blouses, through reading every book written about the topic, through visiting museums, ethnographic museums especially if you are interested in a specific part of Romania, through practising the stitch until you can make it perfect and at last through dedicating a time to make the blouse, not rush it, put all your hopes and believes in a garment that you will probably wear forever.
In the spirit of that, I've started the new year, with an embroidery course I've actually got for my birthday, from the Royal School of Needlework, the Introduction in Goldwork Embroidery, in the hopes that I will get the skills required to make my blouse using this technique. To my knowledge, these blouses were made predominantly in the Banat region of Romania, but there are influences among regions as I am sure it is not specific only to Banat, but is rather an influence from the Balkans and from the Ottoman Empire. Read again my surname and if you need a better reason as to why I'm dedicating my time and energy to this, there isn't one.
The blouse will be a contemporary one, hence the title, which means the embroidery has to be wearable. I've seen examples of Banat blouses, but they are pieces for museums and personal collections, not necessarily made for everyday wear. BUT more on the blouse once I've finished it. At the moment let's turn back to the goldwork embroidery techniques.
This is the example of the finished piece I've saved from the Royal School of Needlework website. Scroll down if you are anxious to see what I've made.
For this course I will need six different types of gold wire, only one of them is used in Romanian blouses, but it doesn't hurt to know them all.
At this very first stage I've found a possible reason as to why this embroidery technique didn't spread in other parts of Romania, because it takes time and space. You will need to work on a loom and not only that, you will need a stationary loom. So, ideally, you will need an embroidery corner, not easily achievable in contemporary houses with a dog and a toddler, I imagine it was unthought about in old peasant Romanian houses. So this type of embroidery must have been done by the small nobility, by women with a lot of time on their hands and with big enough houses to have an embroidery corner.
If this course has taught me anything is that embroidery is embroidery everywhere. As in making Romanian blouses, the first stage was prepping the fabric, making it stable.
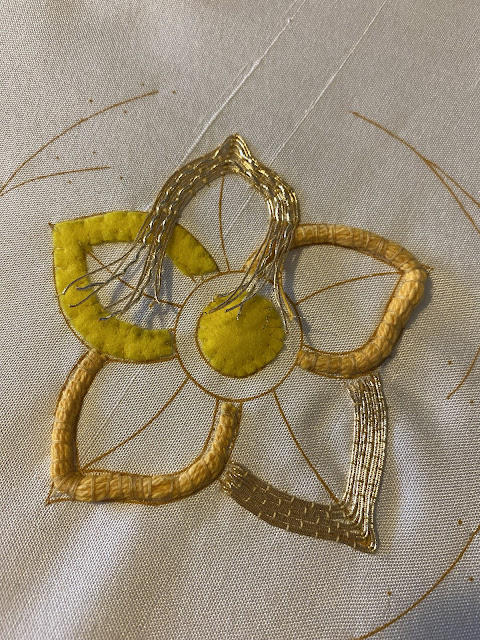
Now comes the new part. In this type of embroidery you don't embroider on a single plan, but you make your work multidimensional and you achieve that by putting felt in the areas you want to raise. In the above case there are three round pieces of felt, each one a bit bigger than the last. It is called padding, felt padding.
Next comes the soft string padding. I'm not entirely sure why the string padding and not continue with felt, but I kinda understand and you will see it if you follow this post.
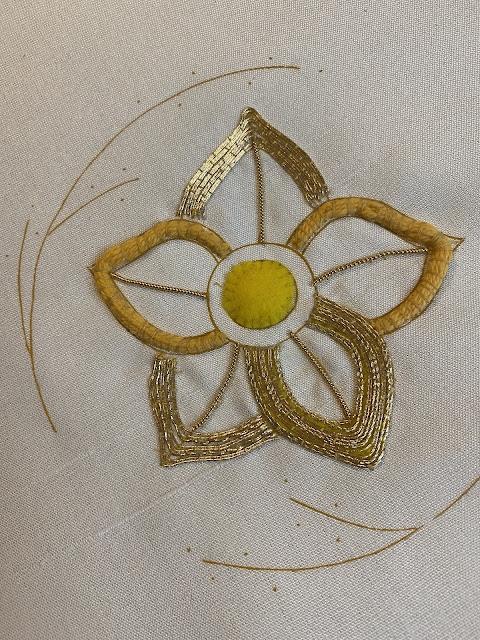
The first work with gold thread comes only in the third class and it is actually the most important stage for my Romanian blouse project, as most of the embroidery will be made using this technique: brick couching with smooth passing.
Smooth passing is the wire, it is very similar to the gold thread used in Romanian blouses, fine wires spun around a cotton core.
This was the stage I've hated, plunging.
Getting the thread through the fabric, easier said than done. You see, different from what anyone imagines as embroidery, in the goldwork embroidery you only work on one side of the fabric and you don't stab the thread through the fabric except for the end. It is called couching. And believe me, stab is the right word used here.
This stage was using the fine gilt rococo thread together with the smooth passing. It is a wavy thread, slightly thicker than the passing and although it does give a very nice effect to the finished piece, if you look at the embroidery, no matter how much I've tried, and believe me, I've tried, it doesn't cover the whole felt underneath.
Plunging rococo was hell and I've hated it.
Third stage was using gilt twist, a twisted wire, which looks good, but again is a nightmare to plunge.
This is my piece after the first three petals. It is good that in my Romanian blouse I will not use twist or rococo, as I've disliked them both.
Then comes pearl purl, a wire that looks like is made of small gold pearl beads. Although I haven't seen it on Romanian blouses, I intend to use it on mine as I like the effect it gives to the borders of the design. I've enjoyed the technique of working with pearl purl and it doesn't require plunging.
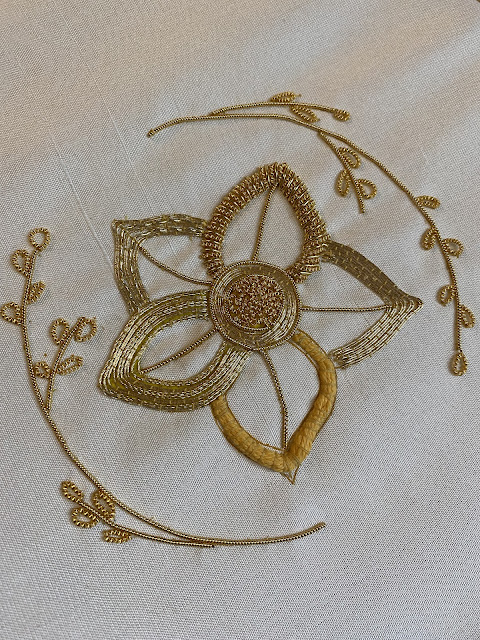
Wire check purl is the thread used in the middle of the flower. I think it is the most used thread in the course, in this case is cut into small bead size pieces to give texture to the middle of the flower. I will not use it on my blouse, but it is an interesting wire to work with. It had an empty core, so it's worked like beads, doesn't matter its length and it is actually three gold wires spun around a three sided needle.
At this point, my beloved embroidery stork scissors was transformed into a goldwork scissors, because I had to cut the gold wire and it kinda damaged my scissors. I was warned by the teacher that this would happen, but as much as I've strolled the internet I couldn't find a small goldwork scissors in Europe and UK is further away possible at this point.
That is my concern about the Romanian blouse as well. If I can't find the wires in Europe I will have to find a way to import then from UK. It's an expensive and lengthily process, that I would rather avoid, but then again a trip to London is always something that pleases me.
This stage was one of my least favourite ones, not because of the techniques I had to use, but because I had to adapt the length of my wire with almost every wire I've used. That meant putting the wire through the thread and the needle, seeing if it fits, if not, getting it out and cutting it and repeating the process.
A new wire was introduced, gilt smooth pearl, again an empty core wire which is worked like beads. I've liked working with it, even if it is very fiddly and fragile.
The last pettal was made by alternating one thread of wire check pearl and two of smooth pearl. Again time consuming, but the end result is spectacular.
I can't be more proud of the result. Yes it has its flaws, but experience comes with practice
About the course:
I did not like the materials provided, the Gutterman polyester thread and the silk fabric the flower is placed on, which is also some sort of polyester silk. Other than that I think all of the materials are of a very good quality. For my blouse I will of course use linen as the base, to avoid any polyester touching my skin. I have to find a replacement for the Gutterman thread, as well and I might already got an idea or two.
Another thing I did not like was that not all of the stages are done by the teacher at the same time as you are doing them. An example was in the middle of the flower. The teacher made the external circle and showed how to plunge and hot to mask the end of the wire, all good, but then she said to use about three rows of smooth passing and then another circle of pearl purl. In my case this put my inner circle on top of the felt. Is it good? I don't know. Was it shown in the final result? Probably not, but at the time it was frustrating.
Other than these two points and yes the one month my kit stayed in customs between UK and Belgium, I would recommend this course, as it taught me a lot of new techniques and the design is made in a manner that at the end you somehow master the techniques.
Although at the beginning I thought the materials provided will not be enough for what I had to do, they were more than enough. This is what I was left with. I used only one needle, I still have plenty of beeswax and Gutterman thread.
Oh yes, that is a thing I forgot to mention, the beeswax. If you want the Gutterman thread not to tangle, you have to use beeswax. As the Romanian blouse is intended to be worn and potentially washed a couple of times throughout its life, how will the beeswax not stain the white fabric?
It is one of the many questions I have to find the answers to, preferably before I embark in this journey.
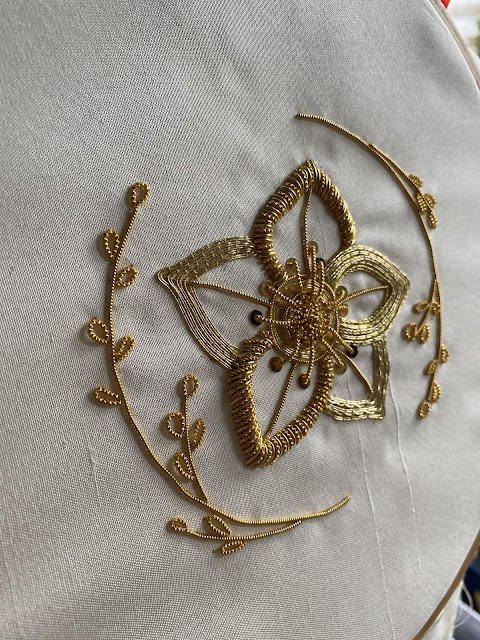
This is my final piece from an angle so you will see it is multidimensional. All the gold threads are made of metal, not sure if exactly gold, but they are metallic and the sequins which are actually called spangles are made of gold.
Now on to my Romanian blouse. I will of course post pictures of my inspiration and my documentation stages on the other post, but for now I know I want it to have the sleeve like that, so large without a bracelet and I am more attracted in smaller designs than in a big one as it is traditional in Banat.
This photo is from Iulia Gorneanu's facebook profile, I'm putting it here just as inspiration, my blouse will not be exactly like that firstly because I don't know where to find textured linen fabric like that and second because I'm not very fond of the goldwork design. I'm thinking of carnations or tulips, again hinting to the Ottomans, a small tree of life maybe, but don't know yet what my final design will be.
And with that my first post about my goldwork project of 2023 has come to an end. Keep an eye for the second part, but realistically it will be published in the Summer if all the stars align. If you are interested, I post a lot on stories over on Instagram @raluca.caranfil


No comments:
Post a Comment